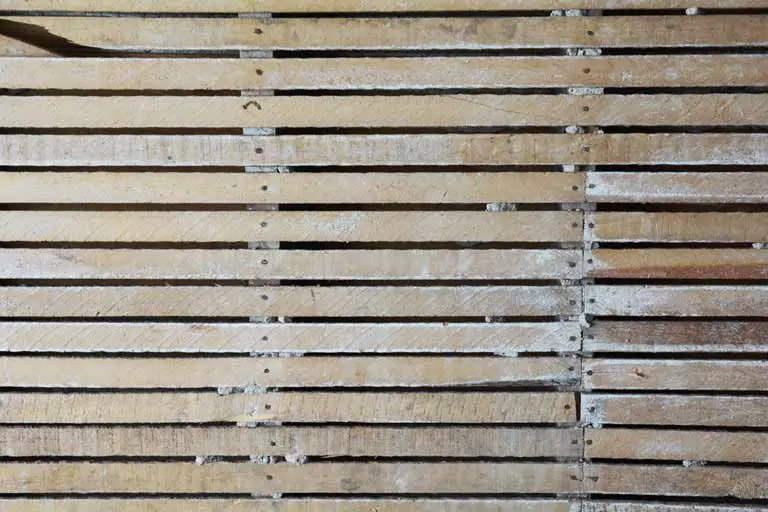
Traditional lath and plaster is a construction technique used for centuries to finish interior dividing walls and ceilings. This method consists of narrow strips of wood called laths. They are nailed horizontally across the wall studs or ceiling joists. These laths are then coated in plaster, creating a smooth and durable surface for your home’s interior.
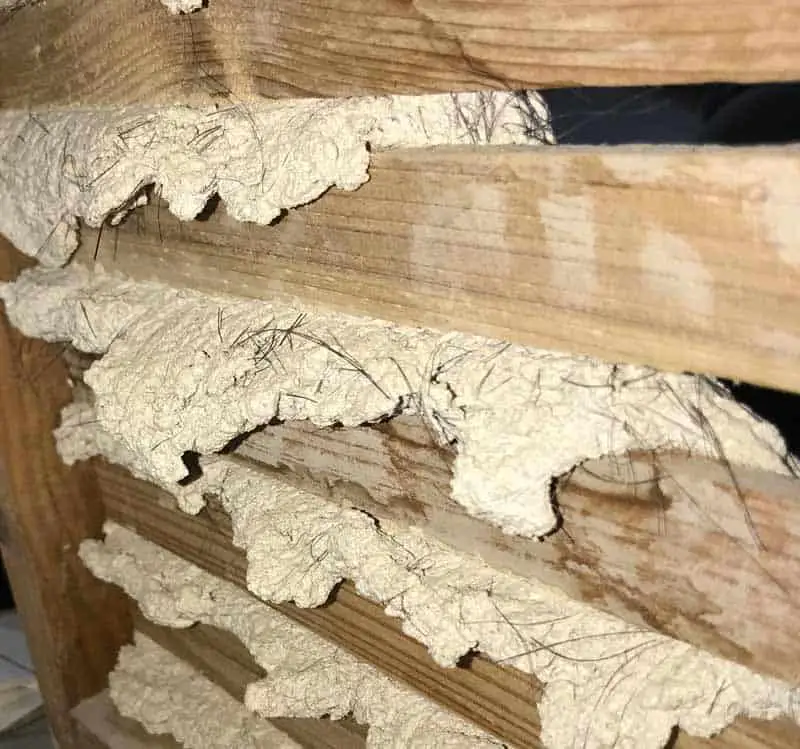
The plaster used in lath and plaster construction is a mixture of lime, aggregate, water, and sometimes animal hair, such as horsehair. This hair adds tensile strength, holding the plaster together and helping to prevent shrinkage as it dries. As the wet plaster is applied over the laths, it works through the gaps in the wood. It then accumulates on the opposite side and forms plaster hooks that hold it in place as it dries.
Though lath and plaster walls are often associated with older buildings, pre-dating the 1940s, this technique still offers some benefits over modern drywall methods. It provides superior sound and heat insulation while more adaptable to irregular or curved spaces. Thus, understanding lath and plaster is a fascinating look into the history of construction and may also provide valuable insights for your home renovation projects.
What Is Traditional Lath and Plaster
Components of Lath and Plaster
Traditional lath and plaster is a building technique for constructing walls and ceilings. The system comprises two main components: the lath and the plaster. The lath is a series of narrow strips of wood, typically made from split timber or sawn soft or hardwood. These strips are usually nailed to studwork or ceiling joists, creating a base for the plaster application.
The lime plaster commonly used with laths is a mixture of lime putty, aggregate, water, and animal hair (often horsehair). The hair adds tensile strength, holding the plaster together and helping to prevent shrinkage or cracks. When applied to the wood lath, the plaster forms a solid, durable surface with some insulation, fire resistance, and soundproofing properties.
History and Evolution
While lath and plaster have been used for centuries, the combination of wood lath and lime plaster became prevalent in the UK and North America from the 18th to the mid-20th century. The construction method fell out of favour with the introduction of plasterboard in the UK in the 1930s and the subsequent rise of drywall in North America.
Traditional lath and plaster jobs used wood lath, which varied in quality and could cause problems, such as cracking when poor-quality wood was used. This was mainly due to the natural moisture content in wood causing expansion and contraction. Metal lath is another option, providing a more stable base for plaster.
Now, lath and plaster construction are no longer commonly used, as modern materials like plasterboard and drywall offer faster and more efficient ways to build walls and ceilings. However, traditional lath and plaster construction can still be found in many older buildings, reflecting this historical building technique’s craftsmanship and durable nature.
Related article: The Advantages and Disadvantages of Lime Plaster
Construction Process
Scratch Coat (The First Coat)
The first step in building a traditional lath and plaster wall is installing the wall studs. These provide the necessary support for the lath, which will be nailed horizontally across the wall studs. The laths, which should be roughly 25mm wide and around 6mm thick, can then be applied. The laths should be spaced to leave a roughly 6mm gap between, about the same thickness as the average little finger.
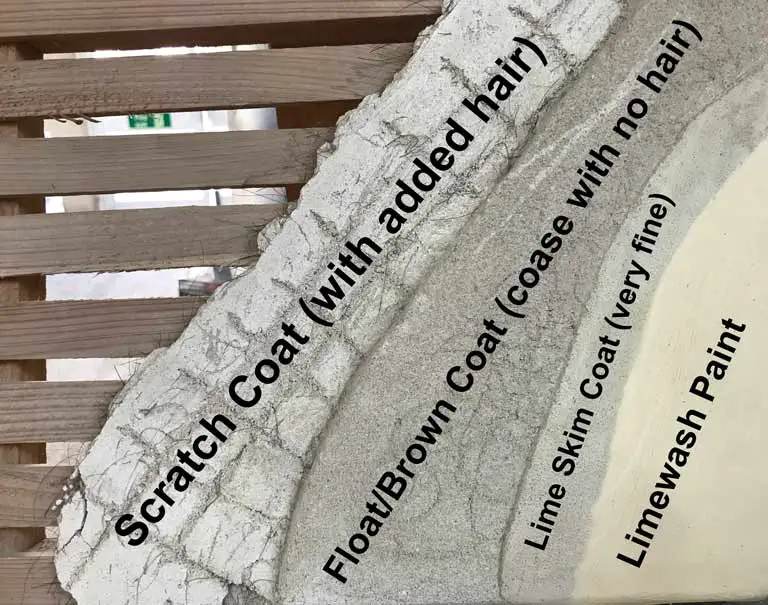
After the lath is in place, it’s time to apply the scratch coat. The scratch coat is a mixture of lime, aggregate, water, and often horsehair. The purpose of the horsehair is to provide additional strength and flexibility to the plaster, helping to prevent cracking.
To apply the scratch coat, you’ll need to spread the plaster mixture onto the lath using a steel trowel. The plaster should be thick enough to ooze between the gaps in the lath and form keys on the other side. These keys will help hold the plaster securely in place as it dries.
It is essential to work methodically, ensuring the plaster is evenly distributed across the lath. After application, the scratch coat must be scratched (hence the name) to provide a good key for the second coat. A rough texture on the scratch coat’s surface will improve the following coats’ adhesion.
Float Coat / Brown Coat (The Second Coat)
Once the scratch coat has had time to cure, it is time to apply the brown coat, which is your levelling layer. This coat is applied similarly to the scratch coat, using a trowel to spread the plaster mixture onto the rough surface of the initial layer.
The brown coat should be slightly finer than the scratch coat and usually won’t contain further hairs or fibres. The brown coat is intended to level the wall and remove imperfections, so it’s important to get it right.
Finish Coat / Skim Coat (The Third Coat)
The final step in constructing a traditional lath and plaster wall is applying the finish coat. This layer allows for a smooth, even finish and should be applied using long, sweeping strokes with a trowel. The finish coat is mainly composed of fine sand and lime, with no horsehair included. This helps to create a smooth surface that can easily be painted or decorated.
Thoroughly mix the lime skim plaster, and apply a thin, even coat to the entire wall, carefully maintaining a consistent thickness. Smooth any imperfections, and ensure there are no visible trowel marks. Once the finish coat has been applied evenly, the wall must fully dry and carbonate. Depending on the conditions, this can take a few weeks to a few months.
Related article: How Many Coats of Lime Plaster is Best?
Lath and Plaster vs Plasterboard and Drywall
Comparing Materials
Traditional lath and plaster walls were constructed using thin strips of wood (laths) nailed to vertical framing studs, with plaster applied in several layers to create a smooth finish. The process typically includes a scratch coat, a brown coat, and a final finish or skim coat. Lath and plaster walls offer advantages such as improved soundproofing and insulation compared to standard gypsum-based drywall panels. Additionally, they provide a dense, fire-resistant barrier.
On the other hand, plasterboard (also known as drywall) is a pre-manufactured panel made of pressed gypsum between two sheets of paper. These panels are cut to size and attached directly to the framing studs. Compared to lath and plaster, plasterboard and drywall installation is faster, more uniform in thickness, and easier to repair.
Advantages and Disadvantages
Lath and Plaster:
- Pros:
- Better soundproofing and insulation
- Denser, fire-resistant material
- Traditional, authentic finish
- Cons:
- Labour-intensive and time-consuming installation
- Inconsistent thickness (depending on the quality of workmanship)
Plasterboard and Drywall:
- Pros:
- Faster and easier installation
- Consistent thickness for uniform walls
- Simpler and less expensive to repair
- Cons:
- Inferior soundproofing and insulation compared to lath and plaster
- Less fire resistance
- Less authentic appearance compared to traditional plaster walls
Consider the desired finish, installation time, and associated costs when deciding between lath and plasterboard for your project. While lath and plaster can create a more authentic look with better insulation and soundproofing, it may not be a practical choice for everyone due to the cost and labour-intensive installation; on the other hand, plasterboard and drywall offer a more modern and efficient solution while sacrificing some of the benefits of traditional plaster walls.
Related article: The Differences Between Lime and Gypsum Plaster Explained
Conclusion
Traditional lath and plaster construction is a historical building technique that still offers some benefits over modern drywall methods. Combining wood lath and lime plaster provides superior sound and heat insulation while more adaptable to irregular or curved spaces.
Though lath and plaster construction is no longer a commonly used method, it can still be found in many older buildings, reflecting the craftsmanship and durable nature of this historical building technique. When deciding between lath and plaster or plasterboard and drywall for your project, consider the desired finish, installation time, and associated costs.
